
Thermal optics work off heat instead of visible light. That makes them useful in low light, uneven lighting, and situations where a warm target stands out from the background. The main choice is not "which one is stronger." It is how you want thermal to fit into your current setup.
Most first-time buyers end up deciding between two formats:
- A standalone thermal scope (also commonly called a dedicated thermal scope) that replaces your day optic at night
- A thermal Clip-On that mounts in front of your existing day scope, so you can keep your current glass and reticle
Below is a practical comparison of standalone thermal scopes and thermal Clip-Ons, with simple tips for first-time buyers.

Standalone Thermal Scope: How It Works and When It Makes Sense
A standalone thermal scope is the "thermal-first" route. You mount it like a normal optic and treat it as the primary sighting system for the session. If you want the simplest mental model and the least gear stacking, standalone is usually easier to learn.
What It Is and How It Works
A standalone thermal scope is a complete aiming system. The thermal sensor captures heat, the device processes the image, and you aim using the scope's own display and reticle. Your daily optic is not part of the chain.
Because the system is self-contained, your sight picture is controlled by one device. That helps beginners because there are fewer variables to balance.
How Zeroing Works
With a standalone, you zero the thermal scope's reticle to match your rifle's point of impact. After you confirm zero, that zero lives inside the thermal scope. In everyday use, repeatability comes down to the same things that matter with normal optics: a solid mount, consistent rail placement, and not constantly changing the setup.
Standalone tends to feel straightforward because the workflow is familiar:
- mount the optic
- zero it
- confirm and use it
How It Handles Day to Night Use
Standalone works best when you expect to stay in thermal for most of the outing. You are not switching between systems or trying to make two optics behave like one. You pick up the rifle, and the thermal view is ready.
The trade-off is that if you often bounce back to daylight viewing, you either swap optics or commit to one optic for that session. Some people are fine with that. Others want quicker switching.
What to Expect From Zoom and Field of View
Most standalone thermals rely on a mix of base magnification and digital zoom. Digital zoom can be useful, but it enlarges the image rather than adding true optical detail. The practical effect is simple: Zoom can help you check a target, but pushing Zoom too far can make the picture look blockier and reduce confidence in small details.
A helpful habit is to scan at a wider view, then zoom only when you need to confirm what you are seeing.
Weight, Balance, and Rail Space
Standalone scopes sit where a normal optic sits. That usually keeps the weight closer to the center of the rifle, which helps balance. You also avoid taking up extra rail space in front of the scope, because there is no separate front-mounted module.
If you care about a rifle that feels consistent in the hands for longer sessions, this is a real advantage.
When Standalone Is Usually the Better Fit
Standalone is often the right first choice if you want:
- A simple thermal setup with fewer moving parts
- One optic that controls the full view and reticle
- A rifle that stays in thermal mode for most sessions

Thermal Clip-On: How It Works With a Day Scope and Who Should Use It
A thermal Clip-On is the "keep my day scope" route. It mounts in front of your existing day optic and supplies a thermal image that you view through that day optic. For many people, this is appealing because it preserves their familiar reticle, eye relief, and general shooting feel.
What It Is and How It Works
A Clip-On is a thermal module designed to sit in front of a day scope. The day scope stays installed. You still look through the day optic. The difference is that instead of seeing a normal daylight image, you see a thermal image provided by the Clip-On.
Your daily scope reticle remains the aiming reference. That is why Clip-Ons are often chosen by people who already have a day scope they trust.
How Zero Retention Works in Real Use
People often describe Clip-Ons as a way to keep your day scope zero. That is the goal. The day optic stays zeroed, and the Clip-On is set up, so the thermal image lines up correctly with your existing reticle.
In real use, repeatability depends heavily on consistency. Clip-Ons reward a clean mounting routine. If the unit goes back on the same way each time, the experience tends to be smoother. If the mounting position varies, alignment can drift, and confidence can drop.
A beginner-friendly way to think about it is this: standalone is "zero the optic," while Clip-On is "keep the day optic zero and keep the front unit consistent."
Why Clip-Ons Feel Flexible
Clip-Ons are popular for mixed conditions. You can run your normal day setup, then add thermal capability when you need it, without removing the day scope. This is often the biggest practical advantage.
This format also feels modular. One Clip-On can potentially support more than one rifle over time, as long as you accept that setup habits matter.
What Changes With Magnification, Zoom, and Clarity
With a Clip-On, your day scope magnification plays a bigger role in how the image looks. As magnification increases, you are effectively enlarging the thermal image. If you push magnification hard, you may notice the limits of the thermal sensor and resolution sooner.
Many Clip-On users end up keeping magnification moderate for general use, then increasing magnification only when they truly need it for checking detail.
Handling, Front Weight, and Space
Clip-Ons add weight forward of the day scope. That can change the balance and make the rifle feel more front-heavy. It can also require more rail space in front of the day optic.
This does not make Clip-Ons bad. It simply means you should plan around weight and space if you want the rifle to feel comfortable.
When Clip-On Is Usually a Better Fit
Clip-Ons are often the right choice if you want:
- To keep your existing day scope and reticle habits
- Fast switching between day use and thermal capability
- A modular path that can scale across setups with consistent mounting
Cost and Scalability: What You Pay Up Front and What You Add Over Time
Cost is not just the device price. It is also about how you plan to use thermal over the next year.
Standalone scopes are often a cleaner "one purchase, one rifle" solution. If you plan to dedicate a rifle to thermal sessions, this can feel simple and predictable.
Clip-Ons can make more sense when you already own high-end day glasses. You keep what you like and add thermal capability as an upgrade. Over time, that modular approach can be easier to scale, especially if you use more than one rifle.
If you are split between both formats, it can help to look at devices that support more than one workflow. That is where multi-role models come into the conversation.
Clip-On vs Standalone Summary with a Practical IOL25 Reference
Standalone usually wins when you want the simplest workflow. You mount one optic, you zero one reticle, and you run the session without stacking systems. It also tends to keep the rifle better balanced.
Clip-Ons usually win when you want to keep your day scope. They are built for people who already like their daytime setup and want thermal capability without replacing it. The tradeoff is that mounting consistency and front weight matter more.
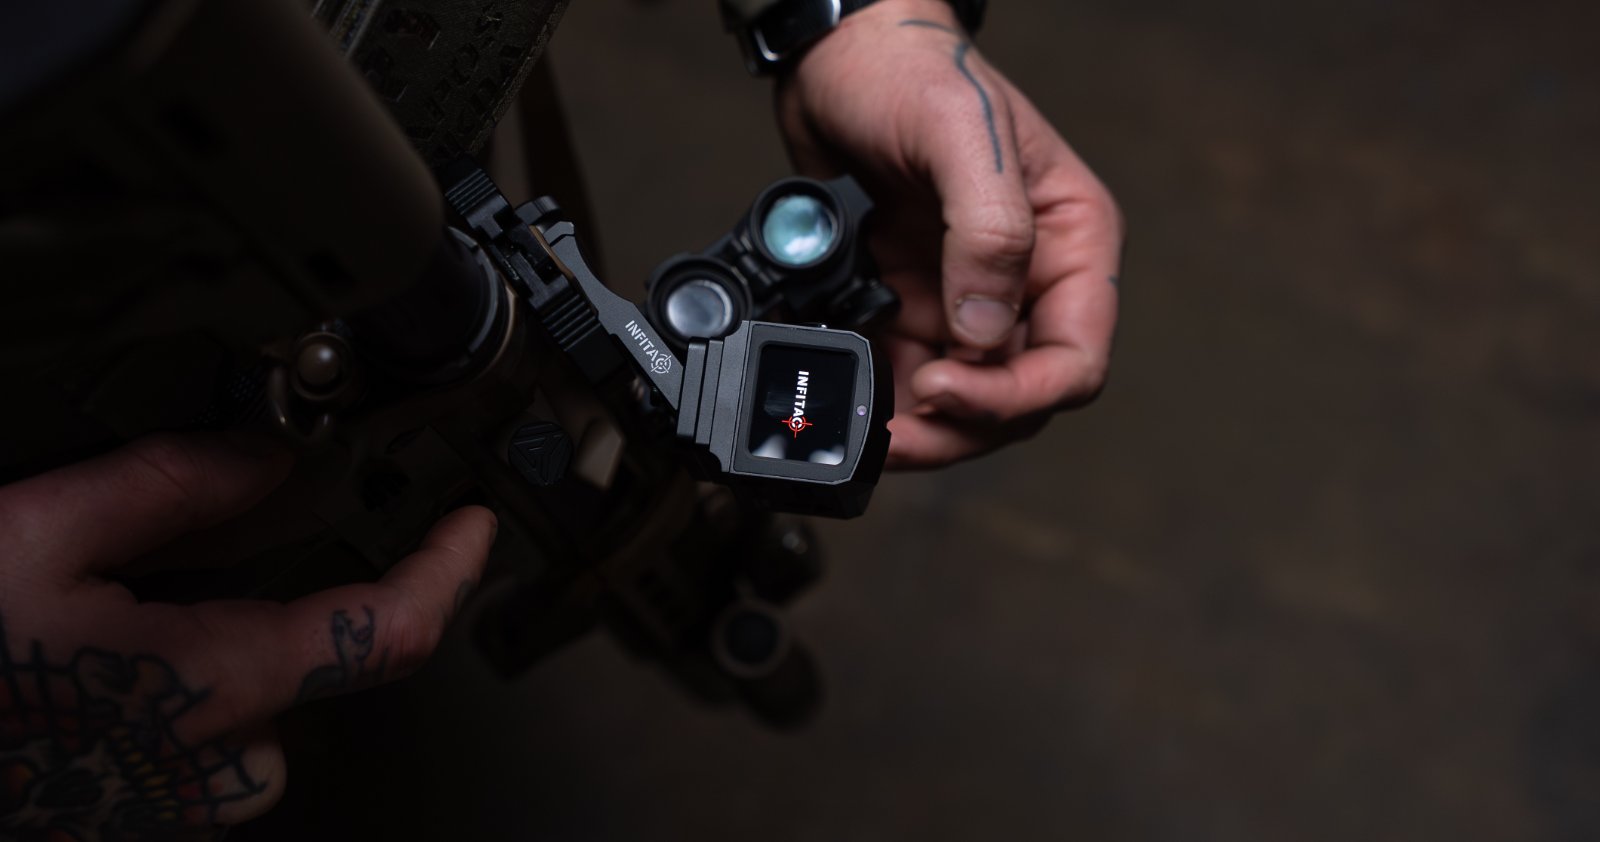
INFITAC IOTS Thermal Sights IOL25, as a multi-role thermal, supports both standalone and Clip-On use on the same device. If you are teaching beginners the difference between these two setups, that "one unit, two workflows" design makes the learning curve easier because you can try both styles without buying two separate optics.
A few specs that support this positioning include:
- A 384×288 thermal sensor with 12 μm pixel pitch and NETD ≤ 20 mK
- IP67-rated protection and a weight of around 520 g (18.3 oz), and a compact size of ≤ 5.6 × 2.7 × 3.5 in
- A replaceable 18650 battery with a stated 6+ hour runtime in thermal mode
For first-time buyers, the real value is not memorizing every number. It has a device that lets you discover whether you prefer the simplicity of standalone use or the flexibility of a Clip-On setup.
Always follow local laws and regulations for ownership and use.

Thermal Rifle Sights IOTS IOL25
FAQs
Q1. Can Thermal Imaging See Through Glass or a Car Window?
No. Standard glass blocks long-wave infrared, so a thermal unit typically reads the surface temperature of the glass, not what is behind it. For a clear view, you need a direct line of sight without glass in between.
Q2. What Is the Difference Between Detection, Recognition, and Identification?
Detection is noticing a heat source. Recognition is knowing the target type. Identification confirms the exact target. For safety and legal compliance, only take action after positive identification.
Q3. How Do Fog, Rain, and Humidity Affect Thermal Performance?
Fog, rain, and humid air can reduce contrast and add visual noise, especially at longer distances. Lower zoom, adjust contrast, and give the unit a moment to stabilize if the image looks flat.
Q4. What Day Optic Settings Help Most When Running a Clip-On?
Set the eyepiece so the reticle looks sharp first, then set parallax to a practical fixed distance and try not to chase it constantly. Keep magnification moderate, since higher magnification can make the Clip-On image feel less forgiving.
Q5. What Quick Pre-Session Checks Prevent Problems in the Field?
Clean the objective lens, verify mount tension, confirm battery power (carry spares if your unit uses replaceable cells such as 18650), check available storage, and run a quick calibration/NUC cycle if your device supports it.
Leave a comment
All comments are moderated before being published.
This site is protected by hCaptcha and the hCaptcha Privacy Policy and Terms of Service apply.